
Audience: Engineers who are exploring or currently managing container deployments with Portainer and Docker on industrial and critical systems. This primer covers introductory concepts around the basic usage of git as a change control tool and as a source management approach for deploying containerized solutions.
Goal: You make a local repository and push it to a remote on GitHub or GitLab. Portainer 2.45 LTS can register this repository as a Source. A Source gives each change a record you can see, with the time and the person who made it.
This primer does not give full instruction in the use of git. Here, git is the tool for change control and deployment source management. The record shows what changed, when it changed, why it changed, and who changed it. An operator, a vendor, and an auditor can all read this record the same way.
1. Install git
Linux
# Debian/Ubuntu
sudo apt update && sudo apt install -y git

# RHEL/Rocky/Alma
sudo dnf install -y git
# check the installation
git --version
Windows
Install Git for Windows from git-scm.com/download/win. Git for Windows gives Git Bash and tools for PowerShell.
Considerations:
- Use Git Bash for the examples in this primer. PowerShell also works, but the quotation marks and path separators are different (
C:\pathand/c/path). - On Linux, the package manager updates git with the distribution. On Windows, update git with the installer.
Identity
Set your identity before the first commit:
git config --global user.name  "Your Name"
git config --global user.email "[email protected]"
git config --global init.defaultBranch main
| Flag/config | Meaning |
|---|---|
--global |
git applies this configuration to all repositories of this user on this operating system. Without --global, git applies it to the current repository only. |
user.name / user.email |
git writes this name and address into each commit. Use the email address of your GitHub or GitLab account. |
init.defaultBranch main |
git makes main the default name of the first branch in new repositories, instead of the old name master. |
The provider command-line tools are optional. They provide a browser-based login and can manage credentials for git. Install them separately from the provider:
- GitHub CLI — cli.github.com
- GitLab CLI (
glab) — gitlab.com/gitlab-org/cli
Authentication commands are in section 7.
2. Create a local repository
The next commands make the directory ~/portainer-stacks, go into it, and make it a repository:
mkdir ~/portainer-stacks && cd ~/portainer-stacks
git init
git initmakes the current directory a repository. It creates the.git/directory for the repository data.
What git init made — the local repository structure
| Path | What it is for |
|---|---|
.git/ |
The complete database of the repository: history, configuration, and objects. If you delete it, you delete all the history. Do not edit the files in it. |
.git/config |
The configuration of this repository (remotes, authentication). Change it only with git config and git remote. |
.git/objects/ |
The content-addressed store of every version of every file. |
.git/refs/ |
Pointers to commits (branches and tags). |
.git/HEAD |
The branch you currently have checked out. |
.git/index |
The staging area, containing the changes for your next commit. |
The files you work on (for example docker-compose.yml) stay next to .git/. git keeps all other repository data inside it.
.gitignore
printf '*.env\nsecrets/\n' > .gitignore
- The
.gitignorefile lists the patterns git must never track (credentials, local data). For Portainer stacks: don't commit.envfiles or TLS keys. Track astack-template.ymlfile instead.
3. Track files: add, status, commit
These commands show the state of the files and put files into the staging area:
# show the state of the files
git status

# put one file into the staging area
git add docker-compose.yml

# put all files in the current directory into the staging area
git add .
Record the changes with a commit:
git commit -m "initial edge stack compose"
| Command/flag | Meaning and points to think about |
|---|---|
git add <path> |
git puts what the file contains now into the staging area. If you edit the file again, add it again. |
git add . |
git puts all changes under the current directory into the staging area, excluding files that match .gitignore. Check git status before using git add . |
git commit -m "msg" |
git records the staged changes as a snapshot. The snapshot cannot change. -m puts the message on the command line. |
git commit -am "msg" |
git stages changes to files it already tracks and records them in one step. New files still need git add. |
Considerations:
- Write commit messages that state what changed and why. In change management, commit messages are your audit trail.
- Each commit has a unique SHA (a hash) that you can always use to identify it.
- A commit is fixed once created, but branch history is not immutable — commits can be rewritten, squashed, or removed from a branch. This primer does not instruct you to do this.
- A remote can retain an old commit, and a provider can record a force-push event. Protect shared branches and use the provider's review and approval controls when history is an audit record.
4. Change tracked files
These commands remove tracked files, rename them, or discard changes:
# remove the file and stop tracking it
git rm config.old

# stop tracking but keep the file (correct a file added by mistake)
git rm --cached secrets.env

# change the name and keep the history
git mv app.yml app-template.yml

# discard uncommitted changes (destructive)
git restore docker-compose.yml

# remove the file from the staging area (keep the changes)
git restore --staged file.txt
| Command/flag | Points to think about |
|---|---|
git rm |
git records the removal like any other change — it becomes part of the history. You can recover the file from an earlier commit. |
git rm --cached |
Use this when git tracks a secret you haven't pushed yet. If you already pushed, rotate the credential — the history still contains it. |
git restore |
This command is destructive. It reverts the file to the last commit or the staged version. |
The commands above change the current working state. Git also has commands that rewrite history — amend, squash, reorder, remove commits — which can change commit SHAs and remove information from the branch view. Do not rewrite a shared branch without an agreed change-control process.
5. Inspect the history and the changes
# short history: one line per commit
git log --oneline

# changes not yet staged
git diff

# changes the next commit will contain
git diff --staged

# all the details of one commit
git show <sha>
| Command | Use |
|---|---|
git log --oneline |
A short history for an audit. Add --graph --all to see branch structure. |
git diff |
Review changes before recording them. |
git show |
Look at any change in the history by its SHA. |
6. Set a remote (GitHub / GitLab)
Make an empty repository in the provider's web interface. Don't add a README or a license — an initialized remote will conflict with your local history on the first push.
Connect your local repository to the remote:
# GitHub, SSH form
git remote add origin [email protected]:youruser/portainer-stacks.git

# GitLab, HTTPS form
git remote add origin https://gitlab.example.com/youruser/portainer-stacks.git

# check: shows the fetch and push URLs
git remote -v
originis the usual name for the primary remote. You can register more than one.- SSH URLs (
git@host:user/repo.git) authenticate with a key — the best choice for automation and frequent use. - HTTPS URLs use a token or password. Simpler to start; some providers accept only a token, not the account password.
Guides from the providers:
- GitHub: how to make a repository
- GitLab: how to make a project
Self-hosted option
Use the same workflow — give the address of your own server to git remote add:
- Gitea — docs.gitea.com (small, a single binary)
- Forgejo — forgejo.org/docs (a fork of Gitea, fully open source)
Self-hosting keeps source material for industrial and critical systems inside your network. The git commands in this primer are the same for every host. A companion primer covers the full self-hosted procedure — this section is only a short introduction.
7. Authentication
| Method | Setup | Points to think about |
|---|---|---|
| SSH key (recommended) | ssh-keygen -t ed25519. Add the public key to your GitHub or GitLab profile. |
Use a passphrase on the key. The agent holds the passphrase for a time so you don't retype it. Best method for CI and automation hosts. |
| HTTPS + Personal Access Token | Make a PAT in the provider's settings. Paste it as the password on the first push. | Providers accept a PAT, not the account password (GitHub since 2021, GitLab usually). You can scope a token and revoke it. |
| HTTPS + credential helper | git config --global credential.helper store (plain text!) or the credential manager (Git for Windows includes one). |
store writes credentials unencrypted to ~/.git-credentials. Use it only on a single-user machine. |
The first push over SSH also checks the identity of the host. Answer yes once to the host-key prompt:
# check SSH authentication for GitHub
ssh -T [email protected]

# check SSH authentication for GitLab
ssh -T [email protected]
Provider CLI authentication
The provider CLI tools can open a login flow and keep the token in their own credential store — useful when HTTPS authentication is required or you don't want to paste a token at every push.
GitHub CLI:
# select GitHub.com, HTTPS or SSH, and browser login
gh auth login

# configure git to use the authenticated GitHub CLI account
gh auth setup-git

# check the login
gh auth status
GitLab CLI:
# authenticate to GitLab and select SSH
glab auth login --git-protocol ssh

# check the login
glab auth status
For a self-hosted GitLab instance, add --hostname gitlab.example.com and follow the prompts. Never put a token in a remote URL or commit it to the repository.
Why this works: the CLI login authenticates you to the GitHub or GitLab service, then stores a token or configures an SSH identity. gh auth setup-git configures git to use the GitHub CLI credential helper; for GitLab, the selected SSH protocol makes git use the SSH key on your machine. When the local repository runs git push, git pull, or git fetch, git reads the remote URL and uses the matching stored credential or key — the repository itself never receives it, and every local repo on that host can reuse the same configured authentication.
8. Push to the remote
git push -u origin main
| Part | Meaning |
|---|---|
git push |
git sends your local commits to the remote. |
origin main |
git pushes the local main branch to the remote origin. |
-u |
git links your local branch to the remote branch — after this, git push and git pull alone are enough. |
9. Many users: keep the local repository current, compare local with remote
A second user (or a second computer) gets the repository:
git clone [email protected]:youruser/portainer-stacks.git
cd portainer-stacks
Routine sync for all users:
# download remote changes and merge into your local branch
git pull

# download remote changes WITHOUT merging (better for inspection)
git fetch

# publish your commits
git push
For a compact command overview, see the Git cheat sheet.
Compare the local branch with the remote branch (many users):
# update the remote-tracking branches first
git fetch origin

# summary: how many commits you're behind or ahead
git status

# your local branch vs. the remote branch
git diff main origin/main

# the same, for one file
git diff origin/main -- docker-compose.yml

# commits the remote has that you don't
git log main..origin/main --oneline

# commits you have that the remote doesn't
git log origin/main..main --oneline
| Pattern | Meaning and points to think about |
|---|---|
fetch before diff |
git diff origin/main compares against your last fetched view. Without a fetch, that view is stale. |
git pull = fetch + merge |
If both sides changed the same lines, git reports a merge conflict. Edit the marked files, then git add and git commit. |
main..origin/main |
"What will I get if I pull now?" |
rejected push (non-fast-forward) |
The remote has commits you don't. Run git pull (or git pull --rebase), resolve the conflict, then push. Don't --force on shared branches. |
A rule for teams: pull → diff → commit → push, in that order. Don't let a local repository fall behind the remote for days.
10. From the remote to a governed Source: Portainer 2.45 LTS
The remote now has your configuration with a history. Up to this point, git gives you that record only for your own changes — it doesn't show the deployments on your devices, who may deploy, or when the live state diverges from the record.
Portainer 2.45 LTS closes that gap. Start at the smallest scale: one device pulls its own telemetry over a REST API, with no subscription. The same container structure and the same registered Source work from one device to fifty. The small example makes the large one strong.
Register the Source (the minimum necessary step)
In release 2.45 LTS, you register a git repository as a Source — a resource with its own access controls and its own workflow history, not an attribute of one deployment. The old shortcut of a raw clone URL in a stack source field no longer works: you must register the repository before deploying. See the Portainer documentation for Sources and workflows.
To register a Source: select App Delivery → Sources in the sidebar, then Add new. The Create Source page opens with two steps — Configure connection and Access control.
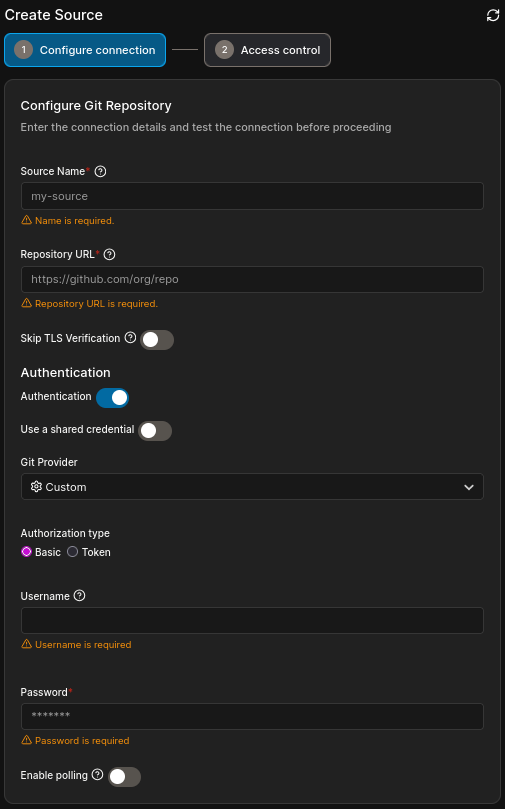
Considerations:
- Access controls live on the Source. You set once who may read, deploy, and edit — everything that deploys from the Source inherits the same controls.
- Workflow history lives on the Source. Portainer records every deploy and redeploy against the Source, independent of which stack used it.
GitOps updates for edge stacks
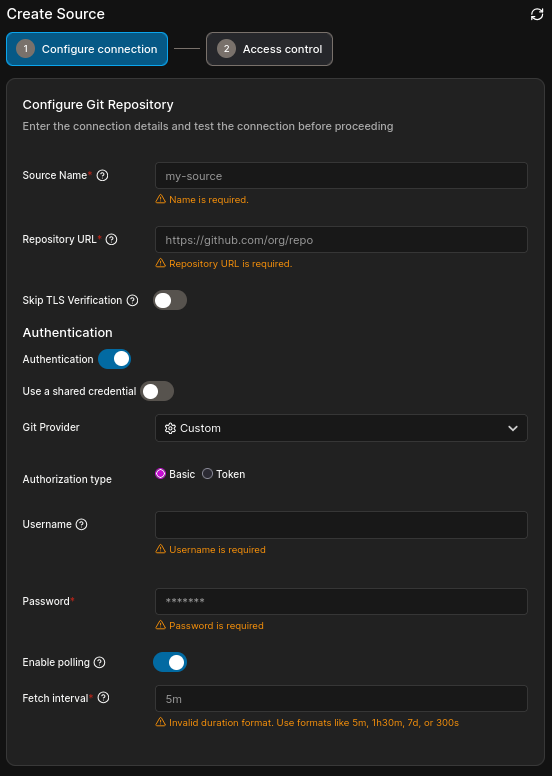
An edge stack deploying from a registered Source can update when the repository changes. Configure GitOps updates for the stack and choose one mechanism:
- Polling: Portainer checks the Source at a defined interval, set on the source configuration page.
- Webhook: the Git provider calls a Portainer webhook after a change, triggering an update immediately instead of waiting for the next poll — configured on the Edge Stack configuration page.
Polling-based GitOps updates are available in Community Edition. Webhook-based GitOps updates and webhook redeploy triggers require Business Edition. Use the mechanism that matches your network path and change-control process.
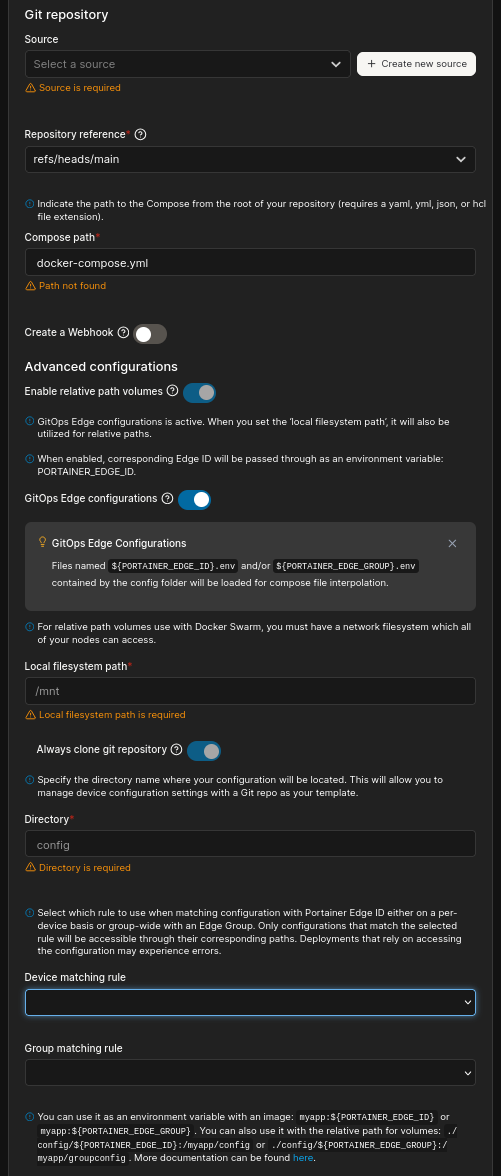
GitOps Edge configurations
Use GitOps Edge configurations when one edge stack needs distinct configuration values per device or device group. Store the configurations in a directory in the Source repository, select a Device or Group matching rule, and point to the repository directory. See the Portainer documentation on GitOps Edge configurations.
Name the files or folders in that directory after the matching Edge IDs or Edge Groups. Portainer deploys the matching configuration with the stack, which can reference PORTAINER_EDGE_ID and PORTAINER_EDGE_GROUP to select the device-specific value. For example, a compose file can mount the matching device-specific directory:
services:
  application:
    volumes:
      - /var/edge/configs/${PORTAINER_EDGE_ID}:/etc/application/config:ro
If no matching file or folder exists, Portainer deploys the stack without a device-specific configuration. Keep common configuration in the stack itself, and reserve Edge configuration for values that must differ between devices.
Deploy and repoint
An edge stack deploying from a registered Source carries a "Managed by Git" banner. Previously, the tie between git and the stack was fixed at creation — if it was wrong, you deleted the stack and started over.
Now you can change the Source of a stack that deploys from git: on the stack view, select Edit Git settings, change the Source, and redeploy. No delete, no redeploy from scratch — a stack can move from a public repository to your internal one (sections 6 to 8).
In the edit form of an edge stack, the Source selector is read-only — the Source can't change after the stack is created, but the branch can.
| Task | Where it happens |
|---|---|
| First deployment | select a registered Source, a branch, and the compose path |
| Change to the internal repository | Edit Git settings on the stack view — no delete, no new stack |
| Redeploy | pull the latest recorded state from the Source |
The governance benefit
When configuration lives in a Source with a history, further steps become possible alongside Portainer's policy featureset, covered in detail in an upcoming primer:
- Change control over vendor deliverables. The vendor delivers against a git-backed Source. "Trust us, it was tested" becomes a change you can see, with a time and a person — both sides read the same record.
- Drift checking. Portainer can compare the live state of devices with the Source automatically. Policy and drift alerts work across all devices, since the audit trail is no longer scoped to one deployment.
- Audit as a report. The auditor gets a history they can query, not a walkthrough of the systems.
The end state: you don't need to open Portainer every day to know your devices obey your policies. Start small. Make every change traceable. Then scale with confidence.
The change-management loop
# edit the compose file locally → check → publish → redeploy in Portainer
# check the changes you want
git diff
git commit -am "edge-stack: raise memory limit"
git push
# then: redeploy the stack from its registered Source
Considerations:
- Portainer reads from the Source, not from your computer.
- A commit without a push deploys nothing.
- Keep secrets out of the repository — use Portainer's environment variables, not
.envvalues in the repo. - One repository can contain several stacks in sub-directories — select the compose path for each stack.
Command quick reference
| Task | Command |
|---|---|
| make a repository | git init |
| get a repository | git clone <url> |
| put files into the staging area | git add <path> / git add . |
| record a commit | git commit -m "msg" |
| look at changes | git diff, git diff --staged |
| history | git log --oneline |
| stop tracking (keep the file) | git rm --cached <path> |
| set a remote | git remote add origin <url> |
| first push | git push -u origin main |
| sync | git fetch / git pull / git push |
| compare local with remote | git diff main origin/main |